Skip to content

Wanscale FAQ

Frequently Asked Questions

On this page, you will find the most frequently asked questions about Wanscale and our solutions. The questions are grouped by category where possible. If your question is not listed, please feel free to contact us.

VNET

How do you create a VNET?

A VNET is necessary to use the services offered by Wanscale. You need to create this VNET on the platform. In a VNET, you can add multiple service edges to connect different locations with each other.

On the homepage, go to 'VNET'. Here you will have the option to create a VNET. You can enter a name, zone, and address space. The address space is the network of your VNET. If you follow all the steps as indicated by the platform, you will have successfully created a VNET.

How do I create a virtual service edge?

To create a virtual service edge, follow these steps on the Wanscale platform:

  1. Log in to the Wanscale Platform: Start by logging in to your Wanscale account.

  2. Navigate to the 'Service Edge' Section: On the homepage, go to the "Service Edge" section from the main menu.

  3. Click on 'Create Virtual Service Edge': Here you will see the option to "Create Virtual Service Edge". Click on this option to start the creation process.

  4. Enter Details for the Virtual Service Edge:

    • Name: Provide a name for your virtual service edge.
    • VNET: Select the VNET to which you want to add the virtual service edge.
    • Zone: Choose the zone where the virtual service edge will be deployed.
    • IP Address: Assign an IP address for the virtual service edge within the address space of the selected VNET.
    • Configuration: Configure any additional settings as needed, such as security policies or routing preferences.
  5. Review Your Configuration: Review all the details you have entered to ensure they are correct.

  6. Create the Virtual Service Edge: Click on "Create" to finalize the creation of your virtual service edge. The platform will start the deployment process.

  7. Verify the Creation: Once the creation process is complete, you can verify that the virtual service edge has been successfully created by checking the "Service Edge" section.


How do I connect my physical service edge with the virtual service edge that I have created on the platform?

To connect your physical service edge with the virtual service edge you created on the Wanscale platform, follow these steps:

  1. Ensure Both Service Edges are Ready:

    • Verify that your physical service edge is properly set up and connected to your network.
    • Confirm that the virtual service edge is successfully created and configured on the Wanscale platform.
  2. Log in to the Wanscale Platform: Log in to your Wanscale account where you created the virtual service edge.

  3. Navigate to the 'Service Edge' Section: Go to the "Service Edge" section from the main menu.

  4. Select the Virtual Service Edge: Find and select the virtual service edge you want to connect to.

  5. Obtain Configuration Details:

    • Retrieve the necessary configuration details for the virtual service edge, such as its IP address, authentication keys, and connection parameters.
    • Note these details as you will need them to configure the physical service edge.
  6. Configure the Physical Service Edge:

    • Access the management interface of your physical service edge.
    • Enter the configuration mode and navigate to the section where you can set up connections or peering with other service edges.
    • Input the IP address, authentication keys, and other connection parameters of the virtual service edge as retrieved from the Wanscale platform.
    • Ensure that the connection settings (e.g., protocols, security settings) match those of the virtual service edge.
  7. Establish the Connection:

    • Save the configuration and initiate the connection from the physical service edge to the virtual service edge.
    • The physical service edge should attempt to establish a secure tunnel or connection to the virtual service edge using the provided details.
  8. Verify the Connection:

    • On the Wanscale platform, check the status of the virtual service edge to ensure that the connection from the physical service edge is recognized and active.
    • Similarly, verify on the physical service edge’s interface that it has successfully connected to the virtual service edge.
  9. Test the Connection: Perform connectivity tests to ensure that data can be transmitted between the physical and virtual service edges without issues. This may involve ping tests, data transfer tests, or other network diagnostics.

How do I connect a service edge to a VNET?

To connect a service edge to a VNET on the Wanscale platform, follow these steps:

  1. Ensure Both VNET and Service Edge are Ready:

    • Verify that your VNET is properly set up and configured on the Wanscale platform.
    • Confirm that the service edge (whether physical or virtual) is correctly configured and operational.
  2. Log in to the Wanscale Platform: Log in to your Wanscale account where you have created the VNET and the service edge.

  3. Navigate to the 'VNET' Section: On the homepage, go to the "VNET" section from the main menu.

  4. Select the VNET: Find and select the VNET to which you want to connect the service edge.

  5. Go to the 'Service Edges' Tab: Within the VNET configuration page, navigate to the "Service Edges" tab or section where you can manage connections.

  6. Add a Service Edge:

    • Click on the option to "Add Service Edge" or "Connect Service Edge".
    • A list of available service edges will be displayed.
  7. Select the Service Edge:

    • Choose the service edge you want to connect to the VNET from the list.
    • You may need to specify additional details such as the zone or specific network segment within the VNET.
  8. Configure Connection Settings:

    • Enter any necessary configuration settings for the connection, such as IP addresses, routing preferences, and security policies.
    • Ensure the settings align with the overall network architecture and requirements.
  9. Save and Apply the Configuration:

    • Save the changes and apply the configuration to establish the connection.
    • The platform will process the connection and link the service edge to the VNET.
  10. Verify the Connection:

    • Check the status of the service edge and VNET to ensure the connection is active.
    • Perform connectivity tests to confirm that the service edge can communicate within the VNET.
How do I configure the designated LAN port of my service edge in my platform?

To configure the designated LAN port of your service edge, follow these steps:

  1. Ensure Your Service Edge is Set Up:

    • Verify that your service edge (physical or virtual) is properly set up and connected to your network.
  2. Log in to the Wanscale Platform: Log in to your Wanscale account where the service edge is registered.

  3. Navigate to the 'Service Edge' Section: On the homepage, go to the "Service Edge" section from the main menu.

  4. Select the Service Edge: Find and select the service edge you want to configure.

  5. Go to the 'LAN Port Configuration' Tab: Within the service edge configuration page, navigate to the "LAN Port Configuration" tab or section where you can manage LAN port settings.

  6. Choose the Designated LAN Port:

    • Select the LAN port you want to configure from the list of available ports.
    • Ports are usually labeled (e.g., LAN1, LAN2, etc.), so choose the correct one based on your network design.
  7. Enter Configuration Details:

    • IP Address: Assign a static IP address to the LAN port or configure it to obtain an IP address automatically (DHCP).
    • Subnet Mask: Specify the subnet mask for the LAN port.
    • Gateway: Enter the gateway address if required.
    • DNS Servers: Configure DNS servers if necessary.
    • VLAN Settings: If the LAN port needs to be part of a specific VLAN, enter the VLAN ID and any other relevant settings.
  8. Apply Security Policies (if any):

    • Configure security policies such as firewall rules, access control lists (ACLs), or encryption settings if applicable to the LAN port.
  9. Save and Apply the Configuration:

    • Save the changes and apply the configuration to update the LAN port settings.
    • The platform will process the configuration and update the service edge accordingly.
  10. Verify the Configuration:

    • Check the status of the LAN port to ensure the configuration is active.
    • Perform connectivity tests to confirm that the LAN port is operational and correctly configured.
How do I configure the designated WAN port of my service edge in my platform?

To configure the designated LAN port of your service edge, follow these steps:

  1. Ensure Your Service Edge is Set Up:

    • Verify that your service edge (physical or virtual) is properly set up and connected to your network.
  2. Log in to the Wanscale Platform: Log in to your Wanscale account where the service edge is registered.

  3. Navigate to the 'Service Edge' Section: On the homepage, go to the "Service Edge" section from the main menu.

  4. Select the Service Edge: Find and select the service edge you want to configure.

  5. Go to the 'LAN Port Configuration' Tab: Within the service edge configuration page, navigate to the "LAN Port Configuration" tab or section where you can manage LAN port settings.

  6. Choose the Designated LAN Port:

    • Select the LAN port you want to configure from the list of available ports.
    • Ports are usually labeled (e.g., LAN1, LAN2, etc.), so choose the correct one based on your network design.
  7. Enter Configuration Details:

    • IP Address: Assign a static IP address to the LAN port or configure it to obtain an IP address automatically (DHCP).
    • Subnet Mask: Specify the subnet mask for the LAN port.
    • Gateway: Enter the gateway address if required.
    • DNS Servers: Configure DNS servers if necessary.
    • VLAN Settings: If the LAN port needs to be part of a specific VLAN, enter the VLAN ID and any other relevant settings.
  8. Apply Security Policies (if any):

    • Configure security policies such as firewall rules, access control lists (ACLs), or encryption settings if applicable to the LAN port.
  9. Save and Apply the Configuration:

    • Save the changes and apply the configuration to update the LAN port settings.
    • The platform will process the configuration and update the service edge accordingly.
  10. Verify the Configuration:

    • Check the status of the LAN port to ensure the configuration is active.
    • Perform connectivity tests to confirm that the LAN port is operational and correctly configured.

Service Edge

How do I remove a service edge from the platform?

To remove a service edge from the Wanscale platform, follow these steps:

  1. Log in to the Wanscale Platform: Log in to your Wanscale account where the service edge is registered.

  2. Navigate to the 'Service Edge' Section: On the homepage, go to the "Service Edge" section from the main menu.

  3. Select the Service Edge: Find and select the service edge you want to remove from the list of configured service edges.

  4. Go to the Configuration or Management Page: Click on the service edge to open its configuration or management page.

  5. Locate the Remove Option:

    • Look for the "Remove" option within the service edge configuration page.
    • This option might be under a settings menu, actions menu, or a similar section.
  6. Confirm the Deletion:

    • Click on the "Remove" option.
    • A confirmation prompt will usually appear to ensure you want to proceed with the deletion.
    • Confirm the deletion by clicking "Yes", "Confirm", or a similar confirmation button.
  7. Verify the Removal:

    • Check the list of service edges to ensure that the service edge has been successfully removed.
    • Verify that all related configurations and connections associated with the service edge are also updated or removed.
How can I detach my service edge from the VNET?

To detach your service edge from the VNET on the Wanscale platform, follow these steps:

  1. Log in to the Wanscale Platform: Log in to your Wanscale account where the service edge and VNET are configured.

  2. Navigate to the 'VNET' Section: On the homepage, go to the "VNET" section from the main menu.

  3. Select the VNET: Find and select the VNET from which you want to detach the service edge.

  4. Go to the 'Service Edges' Tab: Within the VNET configuration page, navigate to the "Service Edges" tab or section where the connected service edges are listed.

  5. Locate the Service Edge: Find the service edge that you want to detach from the VNET.

  6. Choose the Detach or Remove Option:

    • Click on the service edge to access its settings or actions menu.
    • Look for the option to "Detach", "Remove", or "Disconnect" the service edge from the VNET.
  7. Confirm the Detachment:

    • A confirmation prompt will usually appear to ensure you want to proceed with detaching the service edge.
    • Confirm the detachment by clicking "Yes", "Confirm", or a similar confirmation button.
  8. Verify the Detachment:

    • Check the list of service edges within the VNET to ensure that the service edge has been successfully detached.
    • Verify that the service edge is no longer connected to the VNET and that all related configurations are updated accordingly.
How do I assign LAN or WAN ports to a Service Edge?

To assign LAN or WAN ports to a service edge on the Wanscale platform, follow these steps:

  1. Log in to the Wanscale Platform: Log in to your Wanscale account where the service edge is registered.

  2. Navigate to the 'Service Edge' Section: On the homepage, go to the "Service Edge" section from the main menu.

  3. Select the Service Edge: Find and select the service edge you want to configure.

  4. Go to the 'Port Configuration' Tab: Within the service edge configuration page, navigate to the "Port Configuration" tab or section where you can manage port assignments.

  5. Choose the Port Type:

    • Decide whether you want to assign a LAN or WAN port.
    • Ports are typically labeled as LAN1, LAN2, WAN1, WAN2, etc.
  6. Select the Port:

    • Select the port you want to assign from the list of available ports.
    • You may need to click on the port name or an edit icon to access its configuration settings.
  7. Enter Configuration Details:

    • IP Address: Assign a static IP address to the port or configure it to obtain an IP address automatically (DHCP) for WAN ports.
    • Subnet Mask: Specify the subnet mask for the port.
    • Gateway: Enter the gateway address for WAN ports.
    • DNS Servers: Configure DNS servers if necessary.
    • VLAN Settings: If the port needs to be part of a specific VLAN, enter the VLAN ID and any other relevant settings.
  8. Apply Security and Routing Policies (if any):

    • Configure security policies such as firewall rules, access control lists (ACLs), or encryption settings if applicable to the port.
    • Set up routing preferences, such as static routes or dynamic routing protocols.
  9. Save and Apply the Configuration:

    • Save the changes and apply the configuration to update the port settings.
    • The platform will process the configuration and update the service edge accordingly.
  10. Verify the Configuration:

    • Check the status of the port to ensure the configuration is active.
    • Perform connectivity tests to confirm that the port is operational and correctly configured.
How do I determine which plug type I need?

To order the right Service Edge it is important to determine which plug type you need, consider the following factors:

  1. Geographical Location:

    • Different countries and regions use different plug types. Research the plug types used in the country or region where you will be using the device.
    • For example:
      • Type A and B: Commonly used in North America and Japan.
      • Type C, E, and F: Commonly used in Europe.
      • Type G: Commonly used in the United Kingdom and some Asian countries.
      • Type I: Commonly used in Australia and New Zealand.
  2. Device Compatibility:

    • Check the plug type required by your device. This information is usually provided in the device’s manual or on the manufacturer’s website.
    • Ensure the plug type matches the input socket of the device.
  3. Voltage and Frequency:

    • Ensure the plug type is compatible with the voltage and frequency of the power outlets in the country.
    • For example:
      • North America: Typically 120V, 60Hz.
      • Europe: Typically 230V, 50Hz.
  4. Adapter or Converter Needs:

    • If you are traveling to a country with a different plug type, you may need a plug adapter or a voltage converter.
    • A plug adapter allows you to plug your device into an outlet with a different plug type.
    • A voltage converter adjusts the voltage to match your device’s requirements if the voltage is different from what your device supports.
  5. Safety Certifications:

    • Ensure the plug type and adapter (if used) meet the safety standards and certifications required by the country.

To give you an insight into the different types, you will find an overview below.

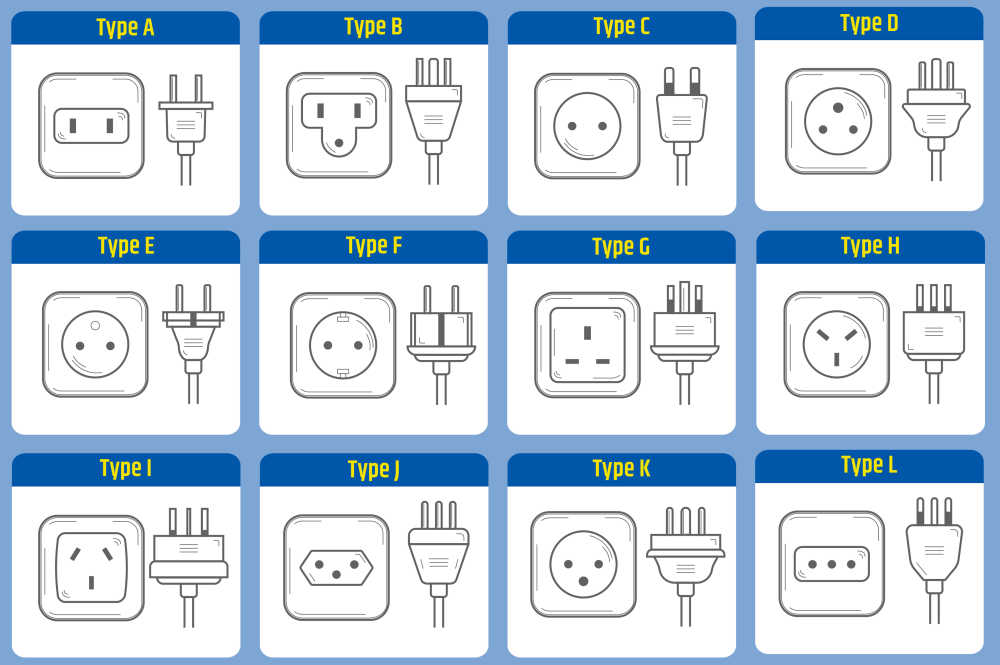
In which countries are which plug types used?

  • Netherlands, type F
  • Belgium, type E
  • Germany, type F
  • Luxemburg, type F
  • France, type C,E
  • Spain, type F
  • Portugal, type F
  • United Kingdom, type G
  • Denmark, type K
  • Norway, type F
  • Sweden, type F
  • Finland, type F
  • Austria, type F
  • Switzerland, type J
  • Italy, type F, L

Always verify per country what the specific requirements are regarding connecting the Service Edge.

Portal

How do I add a user?

To add a user to the Wanscale platform (or any similar platform), follow these steps:

  1. Log in to the Wanscale Platform: Log in to your Wanscale account with administrative privileges.

  2. Navigate to the 'Users' Section: On the homepage go to the "Users" section from the main menu.

  3. Click on 'Add User': Look for the option labeled "Add User".

  4. Enter User Information: Fill in the required information for the new user, such as:

    • Username: A unique username for the user.
    • Email Address: The user's email address.
    • Password: Set a password for the user or allow the system to generate one.
    • Role: Assign a role to the user based on their responsibilities.
  5. Set User Permissions:

    • Define the permissions and access levels for the user. This might include access to specific features, data, or sections of the platform.
    • Ensure the permissions align with the user’s role and responsibilities.
  6. Save and Create the User:

    • Click on "Save" to finalize the creation of the new user.
    • The platform will process the information and add the user to the system.
  7. Notify the User:

    • Send an email notification to the new user with their login details and any necessary instructions.
    • Provide information on how to access the platform and any initial steps they need to take.

Platform

What is the meaning or function of the platform paths under the service edges?

Each individual WAN connection is linked to two service edge gateways. The first is the primary gateway, and the second is the secondary gateway. This secondary gateway serves as a backup for situations where the primary gateway is unavailable.

Als de eerste gateway bijvoorbeeld offline is, neemt de tweede gateway de verantwoordelijkheden over. Het belangrijkste om te begrijpen is dat deze gateways virtuele paden zijn, die de betrouwbaarheid en redundantie van je netwerkverbindingen verbeteren.

How can I group my WAN interface?

After creating and configuring a WAN interface, you will receive a notification indicating that you need to group the WAN interfaces to utilize certain services. The number of WAN interfaces you can group depends on the number of service edges you have.

Je begint met het geven van een naam aan de groep en voegt de WAN-interfaces toe die je wilt groeperen. Na het opslaan van de WAN-interfacegroep, heb je met succes een WAN-groep aangemaakt. Hiermee kun je nu specifieke policies en diensten uitvoeren met de poorten in je interfacegroep.

Dit proces stelt je in staat om de functionaliteit van je WAN-interfaces te maximaliseren door ze logisch te groeperen en beheertaken efficiënter uit te voeren.

How do I configure the firewall rules on the platform?

Once you have configured a working connection via the Service Edge and the platform, you can start setting up firewall rules for traffic identification, address book entries, and IP subnets.

Within the virtual network (VNET), navigate to the firewall rules section. Here, you have options for source, destination, and action. This allows you to specifically allow or block firewall rules based on your security needs.

Once you have configured the desired firewall rules, you only need to click 'Save'. This successfully creates a firewall rule, enabling you to manage the security of your network traffic effectively and in a personalized manner.

How can I configure the policies for interface groups in path selections?

After creating WAN interface groups, you can begin configuring your policies. Within the VNET, navigate to path selections. On this page, you can start with the configuration.

When you click on 'Add Rule', you have several configuration options, including 'Policy Traffic' and 'Match Criteria'. Within 'Policy Traffic', you can specifically indicate which route the traffic should take.

Under 'Match Criteria', you can determine what happens to the interface group when the connection status changes, such as to 'up', 'down', or 'degraded'. This is useful for redundancy, where if one connection fails, another interface group remains active.

Once you have set and saved the configuration, you have successfully configured a path selection. This allows you to manage traffic within your network in a flexible and defined manner.

Wanscale cloud visual

Categories

If you have any other questions, please contact us. We’re here to help!